






Animated GIFs remain one of the easiest ways to grab attention online. Whether you’re creating a social media post, a website banner, a product demonstration, or a simple animation, Adobe Photoshop provides all the tools you need to build and export a professional-looking GIF.
- Step 1: Prepare Your Images or Layers
- Step 2: Open the Timeline Panel
- Step 3: Convert Layers into Animation Frames
- Step 4: Adjust the Frame Order
- Step 5: Set Frame Timing
- Step 6: Choose the Loop Option
- Step 7: Preview the Animation
- Step 8: Export the GIF
- Tips for Better GIF Quality
- Common Problems and Solutions
- Why Use Photoshop for GIFs?
The process is surprisingly straightforward once you understand how Photoshop’s Timeline panel works. By creating a series of frames and controlling their timing, you can produce smooth animations in just a few minutes.
In this guide, we’ll walk through every step of creating an animated GIF in Photoshop.
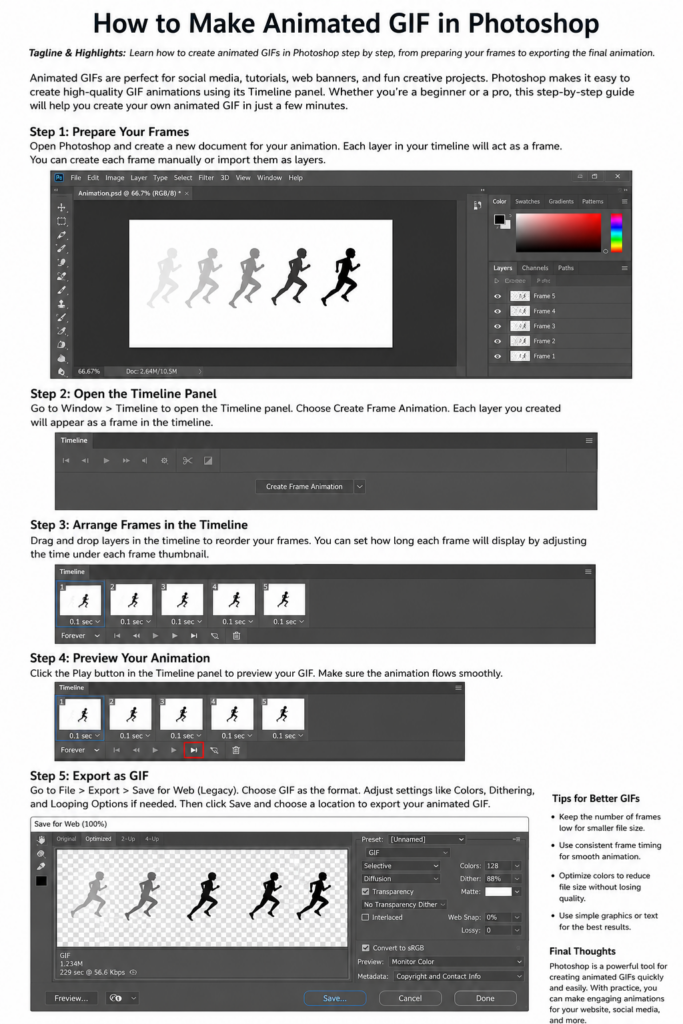
Step 1: Prepare Your Images or Layers
Before creating your animation, decide what will make up each frame.
You can:
- Import a sequence of images
- Use multiple layers in a Photoshop document
- Create artwork directly inside Photoshop
- Import frames from a video
Each visible layer can become an individual animation frame, making layer organization important.
Screenshot 1: Photoshop workspace showing multiple layers prepared for animation.
Step 2: Open the Timeline Panel
Photoshop creates GIF animations using the Timeline panel.
To open it:
- Click Window.
- Select Timeline.
- The Timeline panel will appear at the bottom of the workspace.
Click Create Frame Animation.



If the Timeline opens in video mode instead, click the small menu button and choose Convert to Frame Animation.
Screenshot 2: Timeline panel with the “Create Frame Animation” button highlighted.
Step 3: Convert Layers into Animation Frames
Once the Timeline is open:
- Open the Timeline menu.
- Select Make Frames From Layers.
Photoshop automatically creates one animation frame for every visible layer.
If you’re importing separate images instead of layers, you can manually create frames using the New Frame button.
This saves a significant amount of time compared to building each frame individually.
Screenshot 3: Timeline showing multiple animation frames created from layers.
Step 4: Adjust the Frame Order
Animations only look smooth if the frames appear in the correct order.


Review each frame carefully and rearrange them by dragging and dropping frame thumbnails inside the Timeline.
You can also:
- Duplicate frames
- Delete unnecessary frames
- Reverse frame order
- Copy selected frames
Small adjustments here often make the final animation much smoother.
Step 5: Set Frame Timing
Every frame includes a display duration.
Common timing values include:
- 0.03 seconds
- 0.05 seconds
- 0.10 seconds
- 0.20 seconds
- 0.50 seconds
Fast animations usually use shorter delays, while slower presentations use longer frame durations.
Experiment until the animation feels natural.
Step 6: Choose the Loop Option
At the bottom of the Timeline you’ll find the looping settings.
Common options include:
- Once
- Three Times
- Forever
For most GIFs used on websites or social media, Forever is the preferred choice so the animation repeats continuously.
Step 7: Preview the Animation
Click the Play button in the Timeline.
Watch for:
- Jerky movement
- Incorrect frame order
- Timing that’s too fast or too slow
- Missing layers
- Visual glitches
If necessary, make adjustments before exporting.
Previewing now can save you from exporting multiple versions later.
Screenshot 4: Timeline preview with the Play button highlighted.
Step 8: Export the GIF
Once you’re happy with the animation:
- Click File.
- Choose Export.
- Select Save for Web (Legacy).
In the export window:
- Choose GIF as the format.
- Select the desired color settings.
- Adjust image size if necessary.
- Keep the loop option set to Forever if desired.
- Preview the file size before saving.
Click Save, choose a destination, and your animated GIF is ready to use.
Screenshot 5: Save for Web (Legacy) dialog configured for GIF export.
Tips for Better GIF Quality
A few simple adjustments can noticeably improve your results.
Keep File Sizes Small
Large GIFs load slowly on websites.
Reduce file size by:
- Lowering image dimensions
- Using fewer colors
- Removing unnecessary frames
- Shortening the animation
Use Consistent Timing
If frame delays change dramatically, the animation can feel choppy.
Keeping most frames at the same duration usually creates smoother motion.
Limit the Number of Colors
GIF files support up to 256 colors.
Reducing the color count can significantly decrease file size while maintaining acceptable quality for many graphics.
Optimize for the Intended Platform
Different platforms have different requirements.
For example:
- Websites often benefit from smaller file sizes.
- Social media platforms may compress uploads automatically.
- Marketing banners should balance quality with fast loading speeds.
Testing your GIF before publishing helps ensure the best results.
Common Problems and Solutions
GIF Isn’t Animating
Make sure:
- Multiple frames exist.
- Looping is enabled.
- The file was exported as a GIF rather than a PNG or JPEG.
File Size Is Too Large
Try:
- Reducing image dimensions.
- Lowering the number of colors.
- Removing duplicate frames.
- Increasing frame delay to reduce total frame count.
Animation Looks Choppy
Check:
- Frame order.
- Timing consistency.
- Missing layers.
- Uneven spacing between frames.
Small corrections often make a noticeable difference.
Why Use Photoshop for GIFs?
Although many free online GIF makers exist, Photoshop offers far more control.
Advantages include:
- Professional editing tools
- Layer-based workflow
- Advanced image adjustments
- Precise animation timing
- Better export controls
- Support for complex graphics
For designers, photographers, marketers, and content creators, Photoshop remains one of the most flexible tools for creating custom GIF animations.
Creating an animated GIF in Photoshop is easier than many beginners expect. By preparing your layers, using the Timeline panel, adjusting frame timing, and exporting through the Save for Web feature, you can produce smooth, professional-looking animations for websites, presentations, emails, and social media.
As you become more familiar with Photoshop, you can experiment with advanced techniques such as animated text, fading effects, transitions, and video-to-GIF conversions. With a little practice, animated GIFs can become a valuable addition to your creative toolkit.